Free Shipping* On Orders of $150 or More!
Library Home Detailing Flow Chart Washing & Drying Clay Bars Polishing Paint Protection Wheels & Tyres Plastic Trim Youtube Videos
Polishing is the removal of imperfection such as swirl marks (spider webbing), scratches, water marks or water spots or oxidation.
All of the above will effectively dull the finish. The removal of these imperfections will dramatically improve the level of gloss, clarity and reflection in the paint and produce the mirror like finish people strive for.
Most car polish products use microscopic abrasives to gently level out the paint, until the imperfection is gone. Usually only the smallest amount of paint is removed roughly 40-80 times thinner than the average piece of paper.
For removal of lighter defects, like minor watermarks or light oxidation, hand polishing with a non abrasive polish is often successful. For harsher defects that actually require abrasive polishing we recommend only machine polishing for best results.
Beginners should consider a dual action polisher (often referred to as a random orbit or RO) to ensure no damage is inflicted to the surface. Circular polishers (rotaries) are best only used by experienced detailers or professionals and are often the cause of common defects such as holograms or buffer trails.
Non abrasive polishing can be performed as often as required. A complete, multi-step abrasive machine polish should only be performed once a year, twice at most.
With the use of a correct washing and drying technique, there should be no further requirement for machine polishing, other than spot corrections such as scuffs or scratches that can be treated as required and mild polishing with a finishing polish will have very little impact on the surface.
The ZENTOOL ZEN-21E is a Dual Action Polisher, or sometimes referred to as a "random orbital" polisher.
The ZENTOOL uses an exceptionally large orbit diametre of 21mm to produce fast results while still being safe on the paintwork even for the beginner.
The Flex XC3401 VRG is a true, dual-action polisher with a forced rotation as well as a random orbit oscillation.
As the machine is gear driven, it won't stall under any load unlike some cheap and low powered random orbit machines. The Flex XC3401 VRG offers the serious enthusiast unmatched cutting power, while still with the safe operation of a perfectly balanced dual action machine.
Anyone who has operated the older, heavy style machines will more than appreciate the Flex PE 14-2. It is lighter, and easier to control than any rotary machine on the market, made with all the modern design features people look for in a Flex tool.
The Flex PE 14-2 150 Polisher is designed to provide the most comfortable positioning of your hand and wrist during operation. The lightweight body and ergonomic design minimise user fatigue.
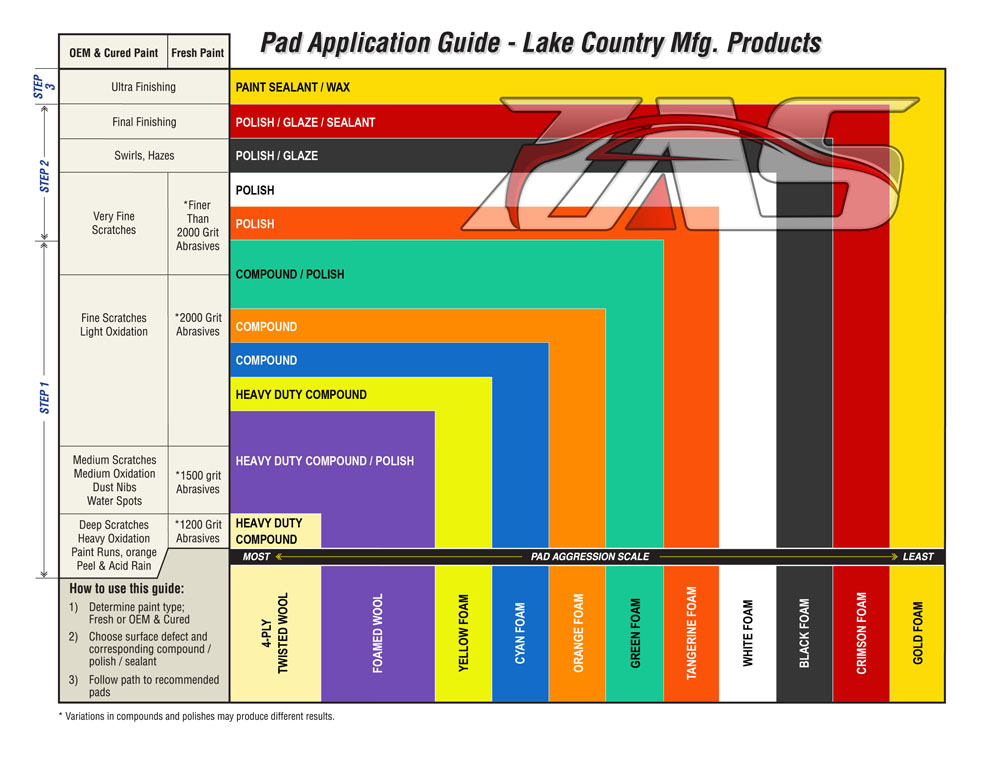
The rule of thumb when choose which car polish to use, is to start with the lightest combination first and then progress to a more aggressive option until the desired level of polishing is achieved.
The unfortunate thing about this process is it can be very time consuming. With experience however, you will learn to have a good idea of what level of polishing is required.
We recommend having at least one of each category polish, in combination with a range of buffing pads, to ensure you have the ability to take on any level of defect.
Compounds are at the high end of the aggressive scale and are designed to remove heavy defects as fast as possible such as heavy wet sanding marks.
When choosing a compound you should also consider the type of machine you are using. Low powered dual action/random orbit polishers often do not have the ability to break down the larger abrasives used in some compounds. In this case, a compound utilising SMAT (Super Micro Abrasive Technology) should be considered.
More often than not, compounds will leave their own defects that will require further refining with a lighter polish such as holograms (buffer trails) and/or compounding haze.
Abrasive polishes are mid range of the aggressive scale and used to remove compounding defects and light to moderate paint imperfections.
In some situations no further polishing will be required after this step. This will depend on a number of variables including the paint being polished (some paints are very soft and darker colours show more defects), machine being used, the buffing pad used with the polish and also technique of the person polishing the paint.
If fine defects still remain then use of a finishing polish may be required.
Finishing Polishes contain only very light abrasives and are designed to be the final polish on even the softest paints. Finishing polishes generally won't remove anything more than the finest defects and have a long working time to allow the user to "burnish" the paint to a high gloss.
Paint Cleaners and Glazes are generally non abrasive, and chemically clean and polish the paint. They will not remove swirls marks, but may "conceal" light imperfections temporarily.
If you paint is in mint condition and you wish to apply a wax or a sealant, then use of a non abrasive paint cleaner is the standard protocol beforehand.
Glazes are also a popular choice due to their high oil content which can give a deeper level of gloss to the paintwork.
Buffing pads add another dimension into the cutting or finishing or the polish being used.
A combination of at least 3 polishes eg. a compound, a polish, a finishing polishing, and a combination of at least 3 three different buffing pads, gives you up to 9 different levels of cut and finishing combinations and the ability to correctly polish just about any surface.
As a minimum we recommend at least one foam cutting pad, polishing pad and finishing pad. As the cutting pad will be doing a large majority of the work, you may want to consider carrying two or more cutting pads. Eventually, the first may become clogged with polish and require cleaning. By carrying additional cutting pads it will allow you to continue to work, without having to wait for the pad to be cleaned and dry.
Professionals or serious enthusiasts often also carry a type of wool buffing pad for heavy compounding, and then a whole range of foam pads.
Machine polishing is like riding a bike, and you should quickly get to know the feel of your machine and equipment. For absolute beginners, follow these basic steps to correctly machine polish your vehicle with a dual action polisher.
Ensure that polish residue isn't left to dry and harden in the foam for extended periods, or it may become hard to completely remove.
It is often a good idea to have a bucket of pad cleaning solution on hand to immediately place clogged pads into and continue working. If pad cleaning solution is not available, cloth washing detergent is a good substitute.
For cleaning best results are achieved using a Grit Guard Pad washer, however for those without a pad washer, allow the pads to soak for 1-2 hours, then using your hands work the polish out of the pours of the foam, then rinse under clean water.
You can place the pads on your machine and spin dry. This will remove about 90% of the water and greatly speed up the drying process.
Hand Polishing will produce very limited results compared to machine polishing and requires a lot of work that is usually done by the machine. This will mostly be performed for polishing with non abrasive polishes like paint cleaners, glazes or "All In One" Polishes containing waxes or sealants.
NOTE: All In One Polish/Sealants may require extended drying times before removal. Check the label and apply/remove as per the manufacturers instructions.
Copyright © 2026 Zen Automotive Suppliers Pty Ltd. Premium Quality Car Care Products. A Zen Auto brand. ZAS and the ZAS Logo are Registered Trademarks of Zen Automotive Suppliers Pty Ltd.
*Free shipping excludes some remote areas and varies for trade accounts. See shipping page for rates that apply.